Native plants + native bees = gardening success

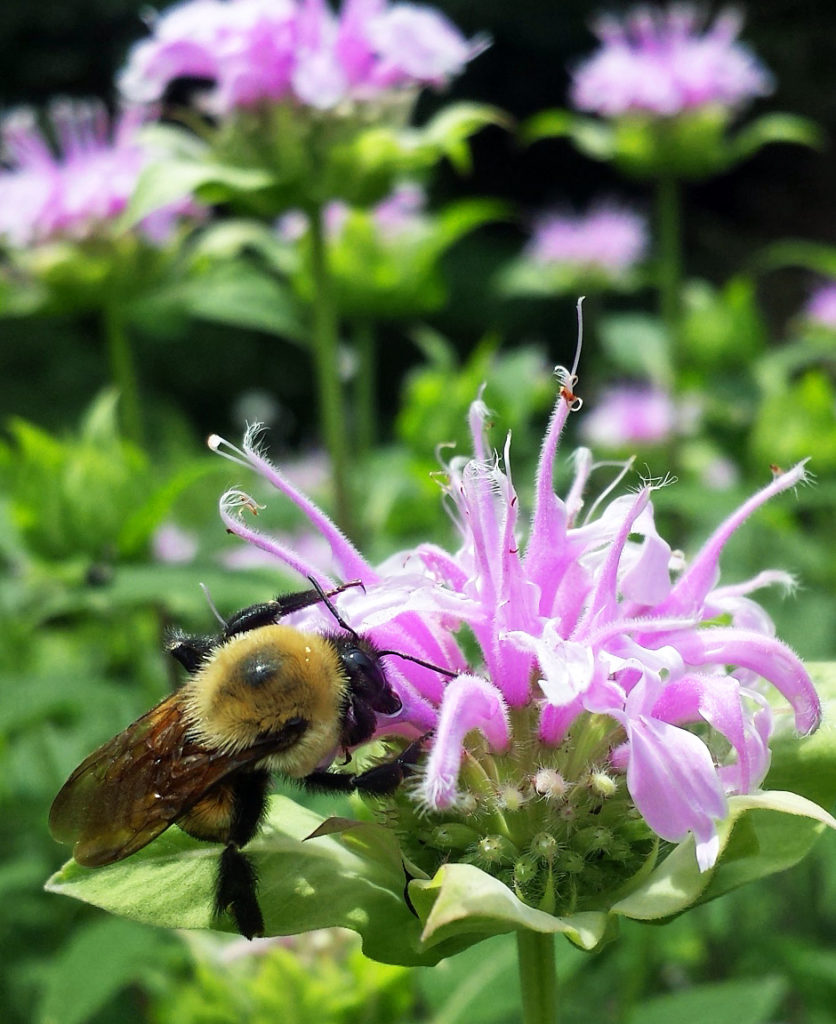
Native bee on native bee balm or Monarda in Sharon, MA

A native bee harvests nectar from native bee balm, or Monarda, in a Sharon, MA perennial and pollinator garden.

My general idea of a successful organic garden is to plant the right native plant in the right place in the right plant and soil community and let nature have its way. Native plants thrive in our native soils, support the local ecosystem by helping our birds and bees thrive.

Just today in my backyard I observed a wren arriving at its birdhouse with a caterpillar and heard the choir of baby wrens competing with open mouths for that nutritious meal.

Think about it. Everything we eat was once a plant, and without insects such as caterpillars and bees, we’d have no plants and no food. So plant a native next time, and you’ll be doing yourself and your neighboring ecosystem a big favor.

Sunstreaked Solstice in a Sharon Rose Garden

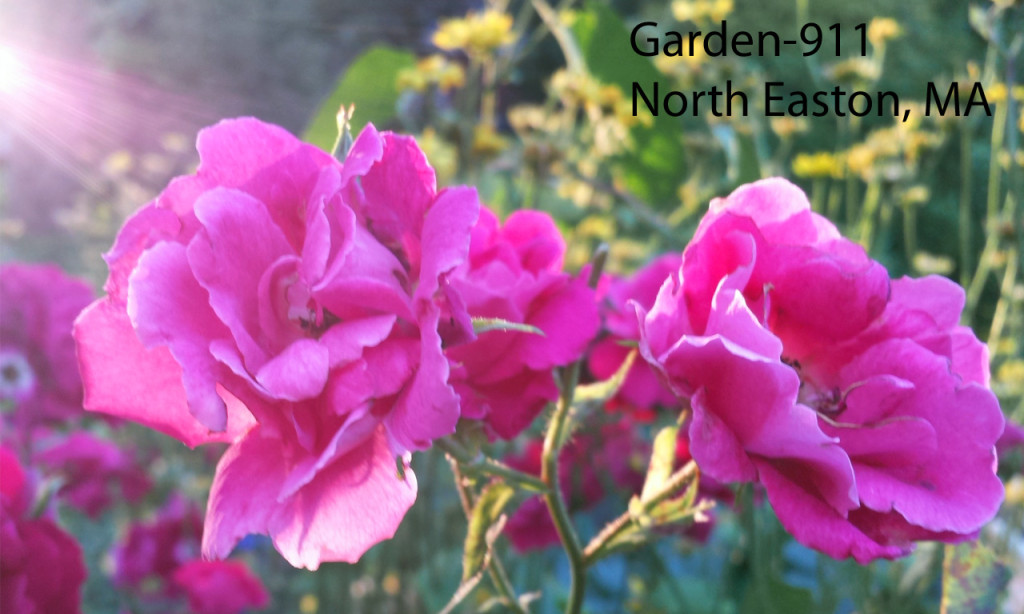
Sharon MA garden roses with streaks of sunlight

Day’s final rays of sun glint onto apothecary roses at the Sharon, MA home of an organic gardening client.

I love to garden until after sunset and well into dusk. That magic hour of dusky sky and light turns flowers and bugs and leaves and all things natural into a magnet for me. Like the way snow changes the way everything looks, the fast fading sky changes each bud and leaf and petal, minute by minute. And the biting bugs? I make sure I’m their least appealing option so I can stay out in the night’s coming as late as I can…and I can already detect day lengths shortening even as the days become warmer.

Free Soil Testing Workshop and Brief Tick Talk May 11th

Please join me at 7 p.m. tonight at the Easton Garden Club’s monthly meeting where I’ll be leading a free soil testing workshop and also presenting a brief tick talk. The meeting is at the Covenant Congregational Church on Centre Street, in the basement gymnasium. More comprehensive testing from UMass for fertility or fertility plus organic matter is available at a small extra cost. The Club will provide bags and ship your sample to UMass.

For each garden area you want tested, bring one clean one-quart clear glass jar and lid, with 3-1/2 cups of dry soil.

THE SINGLE MOST IMPORTANT THING ABOUT SOIL TESTING is to properly sample and let your soil air dry. Info and instructions are below.

What to Bring:

1 Clean, dry one-quart clear glass jar with fairly straight sides, with a tight fitting lid for each sample you want tested. A pasta sauce or mason jar works quite well.

3-1/2 Cups of dry soil in your jar for every sample you want tested. **REMEMBER to properly sample and dry your soil before putting it in your jar.

How to Sample Your Soil:

The most critical step in soil testing is collecting the sample. It is important that you take the necessary steps to obtain a representative sample; a poor sample could result in erroneous recommendations.

The first step is to determine the area that will be represented by the sample. For instance, your veggie garden might be one sampling area, your front island bed another, and your backyard lawn still another. Soil physical appearance, texture, color, slope, drainage, past management and current intended use should be similar throughout the area. It may be helpful to draw a map of the property and identify areas where you will collect samples.

Using a clean bucket and a spade, auger, or sampling tube collect 12 or more sub-samples to a depth of six to eight inches (four to six inches for turf) from random spots within the defined area. Avoid sampling field or plot edges and other non-representative areas.

Avoid sampling when the soil is very wet or within six to eight weeks after a lime or fertilizer application. Next, break up any lumps or clods of soil, remove stones, roots, and debris, and thoroughly mix sub-samples in the bucket. Once the sample is thoroughly mixed, scoop out a little more than one cup of soil and spread it on a clean sheet of paper to air-dry. A fan set on low will help speed the drying; do not apply heat.

TOP 5 GARDENING TIPS FOR APRIL

Do not work on your lawn or garden just after a big rain.

A note from a friendly frittilary butterfly: stepping in your garden or working on your lawn when the soil is wet damages your plants’ ability to thrive. (Image 2017 Carol Lundeen. ALL RIGHTS RESERVED)

#1. CAUTION: WET SOIL – DO NOT ENTER YOUR GARDEN – OR WORK ON YOUR LAWN!

  • Our recent rains have left our soils saturated, and if you step into your shrub and garden beds now you’ll be causing mostly invisible but meaningful damage that makes it harder for your plants to thrive.
  • Compacting your soil: plant roots depend on the spaces between soil particles to hold water and oxygen. When you step on wet soil, you compact these spaces and your plants suffer.
  • One cup of soil may hold as many bacteria as there are people on Earth, never mind the fungi, protozoa, nematodes, arthropods, and earthworms – most of which are beneficial to you most of the time. Together, these tiny beings are a living system called the Soil Food Web, and it’s best to not to step on them when the soil is wet.
  • To test if your soil is dry enough, take a handful of soil and squeeze it. If the soil crumbles easily when you open your hand, it is ready to be walked on or tilled. If it does not crumble, it is too wet. Allow the soil to dry for a few more days and test again before digging.

#2. GET YOUR SOIL TESTED – BEFORE YOU PLANT!

  • Before planting is a good time to get a Routine Soil Analysis from the UMass Soil and Plant Nutrient Testing Lab to check pH and fertility. This economical soil test will provide recommendations for liming and fertilizing as needed, as well as indicating the lead level in the soil.

#3. START YOUR COOL-SEASON VEGETABLES – ONCE THE SOIL DRAINS!

  • Now is a good time to sow seeds of cool season crops such as peas, lettuce, chard, kale, arugula, spinach, carrot, radish, beet and turnips.
  • Plant the seeds as soon as the ground can be worked. Sow your spinach, beets, radish, carrots and lettuce thickly in rows and thin later to the desired spacing (read the label) and to allow them to develop properly. Root crops such as carrots, beets, and radishes should be thinned to a 2-inch spacing to allow the roots to develop properly. They can be thinned as soon as they reach small edible size.

#4. EAGER TO JUMP START YOUR LAWN?

  • Your doctor wouldn’t give you a treatment without first making a diagnosis, right? Same goes with your lawn. Why treat your lawn for grubs or other turf insects if you don’t first discover what’s causing a problem? Grub populations are easy to evaluate, as are other sub-surface and surface insects. Once you diagnose properly, you can treat with a reasonable solution rather than automatically throwing money and chemicals at the situation.
  • Start weaning your lawn off the expensive, stepped conventional petrochemical-based fertilizers by switching to a slow release, low-nitrogen organic fertilizer like Roots Fresh Start. Apply once in early spring after the soil has begun to warm up and apply again in early fall. The water-insoluble nutrients will be recycled and released by your friendly soil microbes slowly over the entire growing season as they’re needed by your turf, rather than getting flushed (along with your money) away with rain and any irrigation.
  • Doing a lawn renovation this year? Wait until September for best results and return on your investment.

#5. MONITOR FOR WINTER MOTH CATERPILLARS

  • Winter moth caterpillars cause damage to many different deciduous plants such as oaks, maples, cherries, ash, crabapples, apples and blueberries. their eggs typically hatch early-mid April, and the young larvae quickly start feeding on flower buds, leaf buds and young developing leaves.
  • Winter moth egg hatch has not yet been observed for this growing season as of 4/5/17 in Massachusetts. Scouts are still reporting that winter moth eggs are orange in color and have not yet turned the blue color that indicates hatch is imminent. Eggs can be sprayed with dormant oil before they hatch, but the eggs can hide under pieces of bark and be hard to reach with spray.
  • Once the caterpillars hatch, they’re eager to eat their host plants. Dormant oil will no longer work, but there’s a fairly safe treatment that simply takes their appetite away. It’s a kind of bacteria called bacillus thuringiensis var. Kurstaki. In some forms it’s approved for use on organic farms. Always read and follow the label.

(BONUS #6.) CELEBRATE ARBOR DAY BY PLANTING A TREE ON APRIL 28 

  • Arbor Day is an annual observance that celebrates the role of trees in our lives and promotes tree planting and care. The best tree selection may be a native tree that is well suited to thrive in your yard with your existing soil, sun, water, and other cultural conditions. Have your soil tested before investing in your new tree or shrub.

AS ALWAYS,PLEASE FEEL FREE TO CONTACT ME IF YOU HAVE ANY QUESTIONS OR NEED A HAND! 

EMAIL CAROL  OR CALL 617-327-9254

Is Bitter-cress a Weed to Worry About in Early Spring?


Bittercress blooming in early April in Sharon, MA

Hairy bitter-cress, Cardamine hirsuta, in bloom now in Sharon, MA.


Hairy bitter-cress is very pretty up close, but is it a weed? If you could ask your MA soil if it’s a weed, the soil would say, “Yes, it’s a weed.” If you ask the whole ecosystem of your MA yard, the system  would agree that it’s a weed.

This is hairy bitter-cress, a native to Asia, that as an exotic invasive plant has an unfair advantage over our native plants, blooming and casting its seed well before most of our natives have even formed flower buds. So, is it a weed to you? If so, better destroy those pretty flowers before they turn to seeds. If you need more info about how, please let me know!r-cress, Cardamine hirsuta, in bloom now in Sharon, MA.

Why Are My Rhododendron Branches Dying?

Rhododendron, borer, Sharon, MA, insect, damage

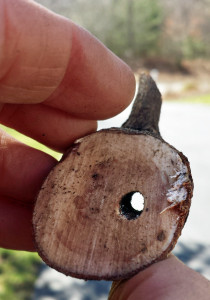
Cross-section of a rhododendron branch with a hole in it. A Rhododendron borer has tunneled all the way through this branch, and the branch is dead.

Could it be rhododendron borers? I started spring pruning for an organic gardening client in Sharon last week, on one of those yummy sunny 60 degree March days. Near her front door are broadleaf evergreen shrub beds on either side of an elegant entry path. My goals were to prune out any dead, use selective pruning to open up dense areas and stimulate new growth for a more balanced and pleasing form of individual shrubs and their big picture impact, and scout for pests.

A dead branch on a rhododendron caught my eye. I’m always very curious about why plants and their parts fail to thrive, so I investigated a bit. I cut off a portion of the dead branch and in its cross section found a dead giveaway of a clue.

It looked like an electric drill had made a 3/16 to 1/4 inch diameter hole in the interior of the stem, parallel to the length of the stem, and I knew right away it was quite likely the work of a rhododendron borer. I kept cutting the branch closer and closer to the ground, and found that the borer hole went all the way down to where the stem met the root flare at soil level. It may be that a second year borer spent some time in the roots, then bored its way toward the tip of this branch, contributing to its demise. I’ll continue to watch carefully for signs of activity and damage, and remember that borers are just one of several flavors of rhododendron pests.
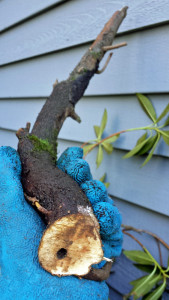
Dead branch on rhododendron, showing a borer hole in its cross-section.

This dead rhododendron branch shows a tunnel entrance created by a rhododendron borer in Sharon, MA.

How do you treat something like borers? Try the following methods, or contact me when you see damage and you need help gathering evidence and deciding how or whether to save your valued shrubs and trees.

Treatment for Rhododendron borers:

  • Look around for dead branches and cut a cross section of one. Look for other signs such as a borer’s exit hole through the branch, frass (insect poop that resembles sawdust), and the condition of the leaves and stems. Photography these signs for your records.
  • Be sure to properly identify the pest that is doing the damage. FYI there’s a separate and distinct Rhododendron stem borer
  • Cut out and destroy all affected tissue – or save a sample to send to a lab.
  • Whether there’s an effective pesticide for the two types of Rhododendron borers seems to depend on what extension service or licensed pesticide professional you ask, and in any case monitoring and prevention are the best next steps. This is an organic client who prefers organic treatments for the health of her family and the environment. An injection of nematodes into the stems may be appropriate if she has the stem borer. I’m looking into it.

Tips to help reduce borers:

  • Keep mulch at least 2-3 inches away from the base of of all plants where the stems meet the earth, including rhododendrons. Your mulch should never be more that 3 inches deep.
  • Keep shrubs well watered during dry periods. One inch of water per week is generally sufficient for established, healthy plants. More water than this is usually needed for plant establishment.
  • Avoid wounding shrubs, as wounds can make it easier for insects and pathogens to enter. If your plants have any branches that directly cross one other, they probably rub against each other when it’s windy, causing abrasion damage and creating entry points for pests and pathogens. Also, do not wound shrubs with lawn mowers and string trimmers.
  • If you don’t have an edged bed around a tree or shrub, make one large enough so that not only will your string trimmer no longer nick the trunk, but the mower won’t run over the root zone. A general guide is to edge out a bed that goes all the way to the drip line, defined as the area all the way from the trunk to the outermost circumference of the tree’s canopy . After cutting out and removing any lawn or weeds, etc. from your edged area, apply 2-3 inches of mulch to the bare soil.

Not all damage to rhododendrons is from borers. There are plenty more causes as well. So be careful, don’t jump to conclusions, get a positive ID, and get help if you’re not sure.

CONTACT ME IF YOU NEED A HAND

IF YOU’D LIKE ME TO HAVE A LOOK AT DAMAGED OR DISEASED PLANTS WITH YOU, I’LL PUT ON MY HORTICULTURIST HAT, HAVE A LOOK AND SUGGEST WHAT YOUR BEST NEXT STEPS MAY BE. CLICK HERE TO CONTACT ME
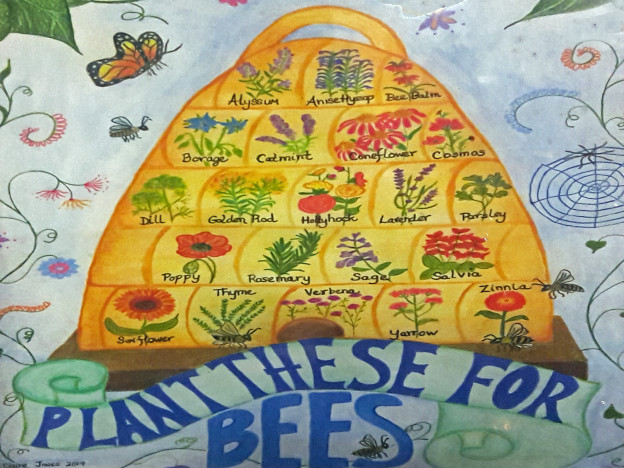
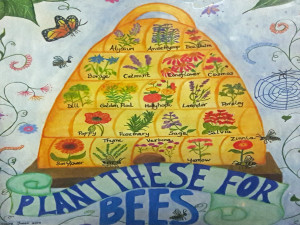
Best plants for honey bees include anise hyssop, rosemary, poppy, bee balm, catmint, coneflower, borage, and thyme.

Sharon Garden Club Hosts Beekeeper Barbara MacPhee’s “Gardens for Honeybees”

Best plants for honey bees include anise hyssop, rosemary, poppy, bee balm, catmint, coneflower, borage, and thyme.

Plant These For Bees, a display at the Sharon Garden Club by guest speaker and beekeeper Barbara MacPhee. Suggested flowers for pollinators include anise hyssop, rosemary, poppy, bee balm, catmint, coneflower, borage, and thyme. [Photo by Dixie Buckland]

Beekeeper Barbara MacPhee

Sharon Garden Club presenter and beekeeper Barbara MacPhee.


Fun honey bee facts from Sharon Garden Club presenter and beekeeper Barbara MacPhee, at our February meeting:

  • Among honey bees, it’s the worker bees (who are all females) that you see (and hear) collecting nectar and pollen. The males, called drones, maintain the hives.
  • It takes 1,152 honey bees flying a distance of 112,000 miles, harvesting from 4.5 million flowers, to produce one pound of honey. Now that is impressive, ladies!
  • In early spring, bees need early-flowering plants like snowdrops, Claytonia and dandelions to support their hives. Forsythia, while a traditional feel-good sign of spring for humans, has zero pollen and zero nectar. Consider replacing one with a pollinator-friendly native shrub like redbud or viburnum.
  • Later in the season, agastache, clover (yes, in your lawn!) and borage, plus winterberry and American holly, are some of the other plants that honey bees favor.

And my two cents: Think about it: just about everything you and I eat was once a plant, most likely a flowering plant. No pollinators, no food. Are you hungry to support pollinators now?

Visit the Sharon Garden Club online


Bid On 2 Hours of Gardening with Me at the Easton Lions Club Auction – 86 minutes to go!

Home garden at Easton's Garden-911 specializes in native plants that support pollinators.

Speckled fritillary butterfly on native coneflower at the home of Garden-911 in Easton, MA. [Photo copyright 2017 Carol Lundeen]

Want a more sustainable garden and support a robust local non-profit! Just 1 hour, 26 minutes until the bidding ends on two hours of side-by-side gardening with me, to benefit the Easton Lions Club.

Learn more and BID NOW!

BIDDING ENDS AT 4 P.M. TODAY!

Miss Twiggy Aces RI Certified Horticulturist Exam

Rhus typhina winter twig with bud in leaf scar

Winter bud inset in a leaf scar of Rhus typhina, staghorn sumac in Sharon, MA. It looks like the face of a lion, which is how I remembered it for my RI Certified Horticulturist exam. [Photo Copyright 2017 Carol Lundeen].

Miss Twiggy.  That’s what my wife has been calling me  lately.  Our dining room table has practically been crawling with the winter twigs of trees, shrubs, and vines: messy, shedding, needle-dropping deciduous and evergreen winter twigs.  I’ve been studying them for six weeks for my RI Certified Horticulturist exam.  Why?  I’m a nature girl, and I love looking at things up close.

Did you have any idea that a winter twig could be so adorable as the one shown above?  Me neither.  Until Dr. Susan Gordon taught me how to notice and appreciate the diversity of these things.  I want to get so I can tell the winter twig of a glossy false buckthorn from a black cherry as easily as a dalmation from a beagle.  I aced both the written and ID portions of my exam Monday night.  I’m certifiably certified, so happy there’s so much more to learn, so thankful to everyone who’s helped me, and I can’t wait for the new gardening season!

How to Keep Your Garden Plants Alive in Winter in a Drought

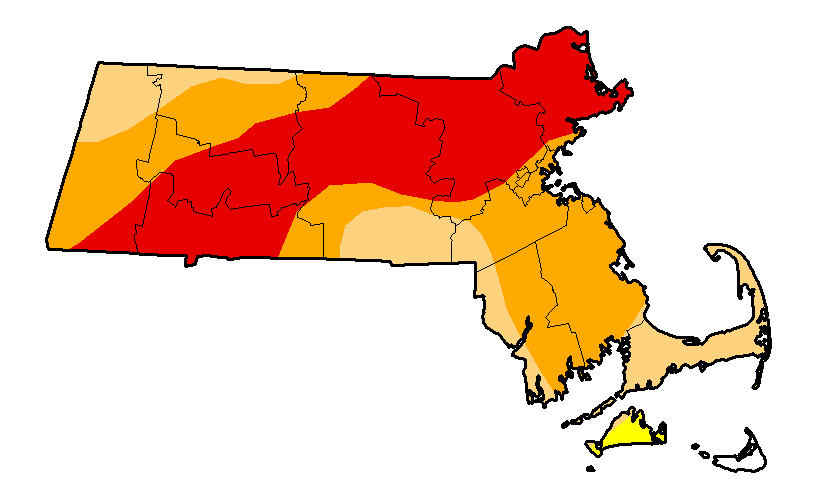
MA drought map showing more than one third of the state in extreme drought condition

MA drought map updated December 13, 2016.  The area in red, about one third of the state, is in an Extreme Drought condition.

What do you do keep your drought-stressed plants alive this winter?  It’s hard to put a Band-Aid on drought-stressed plants, but here are some things you can do:

  • KEEP WATERING UNTIL THE GROUND FREEZES IN THE FALL/EARLY WINTER.  Check with your city or town to see if even now, in late December, there’s a current watering ban.  Especially with new plantings, and also with drought-stressed ones, you generally want to give them the equivalent of one inch of water per week all the way until the ground freezes.  If time or water is limited, focus on watering your most valuable plants, such as trees and shrubs.
  • IMPROVE YOUR SOIL.  On your lawn for instance, just 1/4 inch of compost every fall makes a huge difference in the resilience of your turf plants.  For your planting beds, pull back the mulch, spread 1/2 inch of compost or leaf mold,  scratch it into the soil surface, and put the mulch back in place.  This will increase the soil’s ability to hold moisture and make nutrients more available to the roots of your plants.  Think in terms of feeding your soil (the soil food web), not feeding your plants.
  • MULCH.  It’s not to late to apply 2-3 inches of mulch to all areas of exposed soil.  Do not let mulch come in contact with the trunks of your trees and shrubs, where it transitions into the root.  This area is called the root flare and should never be covered.  If you see a mulch volcano around the base of a tree, the mulch is suffocating the tree, which stresses it, makes it vulnerable to pests and pathogens, and puts the tree on a path of decline.  About the best mulch of all is fallen leaves that you’ve chopped up with your lawn mower and spread on your beds.  Speaking of chopped leaves, you can also pile them up, adding water to create a water film on most of the leaf surface area, and let them sit for a year or two.  The result, called leaf mold, is another source of organic matter that will make your plants sing.
  • PLANT NATIVES.  Many people picture native plants as being weedy and leggy.  In fact, native plants are best adapted to not only survive, but thrive in the existing environmental conditions.  Test your soil and know how much sun your planting site gets.  Then, it’s easy to select plants that should do quite well with minimum inputs, once established.

For more info about the drought status in MA, visit http://droughtmonitor.unl.edu/Home/StateDroughtMonitor.aspx?MA