
Category Archives: Spring Gardening

How, When and Why to Stake Your Tall Perennials in Early Spring

How to stake your garden perennials in spring

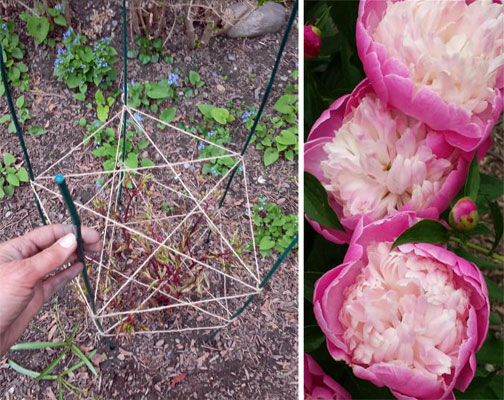
Supporting tall perennials like peonies, before they get tall, is best done by late April, as shown here in a Cambridge, MA ornamental garden. If you don”t support them on time, their stems may break, dashing their flowers to the ground, especially during heavy rains and windy weather. The constantly-blooming garden was designed by Cheryl Salatino of Dancing Shadows Garden Design.

Got peonies or other perennials that will get tall? Late April is time to protect their structure for season by properly supporting them by staking. Play the audio to learn about how I like to do my staking.


Please follow and like us:

GARDEN DESIGN FOR LATE SPRING BLOOMS

THE POWER OF DIAGONAL DESIGN WITH STRONG FOREGROUND, MIDDLEGROUND AND BACKGROUND

Dappled afternoon sun glints off a latticed front entry, backed by a story-high rhododendron that anchors the middleground of this front yard garden design in Sharon, MA. In the foreground a pavered path from the driveway to the front door is lined with two masses of bearded iris that multiply the color effect of the rhododendron’s purple-pink blooms. Pink peonies provide visual pop that make this diagonal perspective so powerful in the design. Pink dianthus in the lower left mirror the peonies’ color impact. In the distance, mature deciduous trees near the property line form the background layer of the composition. Photo copyright 2018 Carol Lundeen. All rights reserved.


Please follow and like us:

HOW TO STAKE GARDEN PEONIES, OTHER TALL PERENNIALS

Here’s the short answer to how to stake peonies, Rudbeckia laciniata ‘Herbstonne,’ baptisia, asters and other tall and/or vase-shaped perennials that are at risk of collapsing under their own weight this season. Do these in the spring:

EIGHT STEPS TO STAKE GARDEN PEONIES

  1. Get stakes, twine and pruners.
  2. Set five stakes evenly around peony.
  3. Tie twine to one stake.
  4. Loop twine around each consecutive stake.
  5. Return to and loop around first stake.
  6. Loop twine around every other stake.
  7. Return to first stake
  8. Cut and tie off twine.

For more answers, here’s an expanded explanation:

  1. Gather five garden stakes for each perennial, plus twine and sharp scissors or pruners to cut the twine. Safety glasses or goggles are a great idea too, as getting your eye poked by a stake takes all the fun out of staking.
  2. Push your five stakes into the ground, evenly spaced around the drip line of your perennial. If you view your perennial from above, the drip line is the circle or perimeter of the foliage from which water drips to the ground.
  3. This third step completely encloses all your perennial stems. Starting with a stake that is towards the back of the perennial, tie a slip knot around the stake about 15 inches above the ground. Next, one stake at a time, consecutively, draw your twine around your circle of stakes, making a complete loop (not a knot) around each stake as you go. When you get back to your starting stake, make a complete loop around it, too.
  4. This fourth step creates a supporting matrix of spaces through which your stems will grow. Resuming at what was once your first and is now your last stake, draw your twine around every other stake, making a complete loop around each of these stakes as you go. You may need to carefully pass the twine between stems to reach your next stake. When you get back to your original stake, cut your twine long enough to tie a slip knot, and tie the knot. If you’ve done this correctly and you could look at it from above, your twine pattern will look like a star inside a circle.
  5. Repeat steps 3 and 4 at least one more time, higher up on the stakes to support future growth. You may be tempted to cut the stakes to a lower height, but you’ll risk not having enough support for the flower stems once they elongate and your flowers are in full bloom, especially after they become heavy with rain.
Please follow and like us:

TOP 5 GARDENING TIPS FOR APRIL

Do not work on your lawn or garden just after a big rain.

A note from a friendly frittilary butterfly: stepping in your garden or working on your lawn when the soil is wet damages your plants’ ability to thrive. (Image 2017 Carol Lundeen. ALL RIGHTS RESERVED)

#1. CAUTION: WET SOIL – DO NOT ENTER YOUR GARDEN – OR WORK ON YOUR LAWN!

  • Our recent rains have left our soils saturated, and if you step into your shrub and garden beds now you’ll be causing mostly invisible but meaningful damage that makes it harder for your plants to thrive.
  • Compacting your soil: plant roots depend on the spaces between soil particles to hold water and oxygen. When you step on wet soil, you compact these spaces and your plants suffer.
  • One cup of soil may hold as many bacteria as there are people on Earth, never mind the fungi, protozoa, nematodes, arthropods, and earthworms – most of which are beneficial to you most of the time. Together, these tiny beings are a living system called the Soil Food Web, and it’s best to not to step on them when the soil is wet.
  • To test if your soil is dry enough, take a handful of soil and squeeze it. If the soil crumbles easily when you open your hand, it is ready to be walked on or tilled. If it does not crumble, it is too wet. Allow the soil to dry for a few more days and test again before digging.

#2. GET YOUR SOIL TESTED – BEFORE YOU PLANT!

  • Before planting is a good time to get a Routine Soil Analysis from the UMass Soil and Plant Nutrient Testing Lab to check pH and fertility. This economical soil test will provide recommendations for liming and fertilizing as needed, as well as indicating the lead level in the soil.

#3. START YOUR COOL-SEASON VEGETABLES – ONCE THE SOIL DRAINS!

  • Now is a good time to sow seeds of cool season crops such as peas, lettuce, chard, kale, arugula, spinach, carrot, radish, beet and turnips.
  • Plant the seeds as soon as the ground can be worked. Sow your spinach, beets, radish, carrots and lettuce thickly in rows and thin later to the desired spacing (read the label) and to allow them to develop properly. Root crops such as carrots, beets, and radishes should be thinned to a 2-inch spacing to allow the roots to develop properly. They can be thinned as soon as they reach small edible size.

#4. EAGER TO JUMP START YOUR LAWN?

  • Your doctor wouldn’t give you a treatment without first making a diagnosis, right? Same goes with your lawn. Why treat your lawn for grubs or other turf insects if you don’t first discover what’s causing a problem? Grub populations are easy to evaluate, as are other sub-surface and surface insects. Once you diagnose properly, you can treat with a reasonable solution rather than automatically throwing money and chemicals at the situation.
  • Start weaning your lawn off the expensive, stepped conventional petrochemical-based fertilizers by switching to a slow release, low-nitrogen organic fertilizer like Roots Fresh Start. Apply once in early spring after the soil has begun to warm up and apply again in early fall. The water-insoluble nutrients will be recycled and released by your friendly soil microbes slowly over the entire growing season as they’re needed by your turf, rather than getting flushed (along with your money) away with rain and any irrigation.
  • Doing a lawn renovation this year? Wait until September for best results and return on your investment.

#5. MONITOR FOR WINTER MOTH CATERPILLARS

  • Winter moth caterpillars cause damage to many different deciduous plants such as oaks, maples, cherries, ash, crabapples, apples and blueberries. their eggs typically hatch early-mid April, and the young larvae quickly start feeding on flower buds, leaf buds and young developing leaves.
  • Winter moth egg hatch has not yet been observed for this growing season as of 4/5/17 in Massachusetts. Scouts are still reporting that winter moth eggs are orange in color and have not yet turned the blue color that indicates hatch is imminent. Eggs can be sprayed with dormant oil before they hatch, but the eggs can hide under pieces of bark and be hard to reach with spray.
  • Once the caterpillars hatch, they’re eager to eat their host plants. Dormant oil will no longer work, but there’s a fairly safe treatment that simply takes their appetite away. It’s a kind of bacteria called bacillus thuringiensis var. Kurstaki. In some forms it’s approved for use on organic farms. Always read and follow the label.

(BONUS #6.) CELEBRATE ARBOR DAY BY PLANTING A TREE ON APRIL 28 

  • Arbor Day is an annual observance that celebrates the role of trees in our lives and promotes tree planting and care. The best tree selection may be a native tree that is well suited to thrive in your yard with your existing soil, sun, water, and other cultural conditions. Have your soil tested before investing in your new tree or shrub.

AS ALWAYS,PLEASE FEEL FREE TO CONTACT ME IF YOU HAVE ANY QUESTIONS OR NEED A HAND! 

EMAIL CAROL  OR CALL 617-327-9254

Please follow and like us:
The Dirt on Seedings, Resilience, and Diversity

Before I left for New Zealand at the very end of January, I started a tray of Viola seeds in an old egg carton, hoping for the best.  Many germinated before my departure, many didn’t, and this time around, the laggards are the winners! While the first to sprout are long done for this world, the next round of sprouters are alive and well and growing fast, most of them having put out their first true leaves with a second one on the way.  This reminds me of the value of diversity in all living things.   Next step is to start fertilizing them lightly, as I planted the seeds in soil-less mix, and now that the true leaves are forming they need some feedl.  I’ll be potting them up soon, and as I do I’ll add a dollop of compost to each pot, disturbing the thread-frail roots as little as possible.

Please follow and like us: