Category Archives: Soil

FULFILL THE DREAM OF CREATING A POLLINATOR GARDEN

WHY NOT TURN YOU LAWN INTO A CERTIFIED HABITAT GARDEN FOR BUTTERFLIES, BEES, BIRDS?

Turning a lawn into certified pollinator habitat gardenWe’re helping a homeowner in Seekonk, MA fulfill her dream of turning most of her lawn into pollinator habitat. Collaborating through the iterative design, installation, and maintenance phases, the client herself has gotten earth under her fingernails and dirtied the knees of her jeans every step of the way.

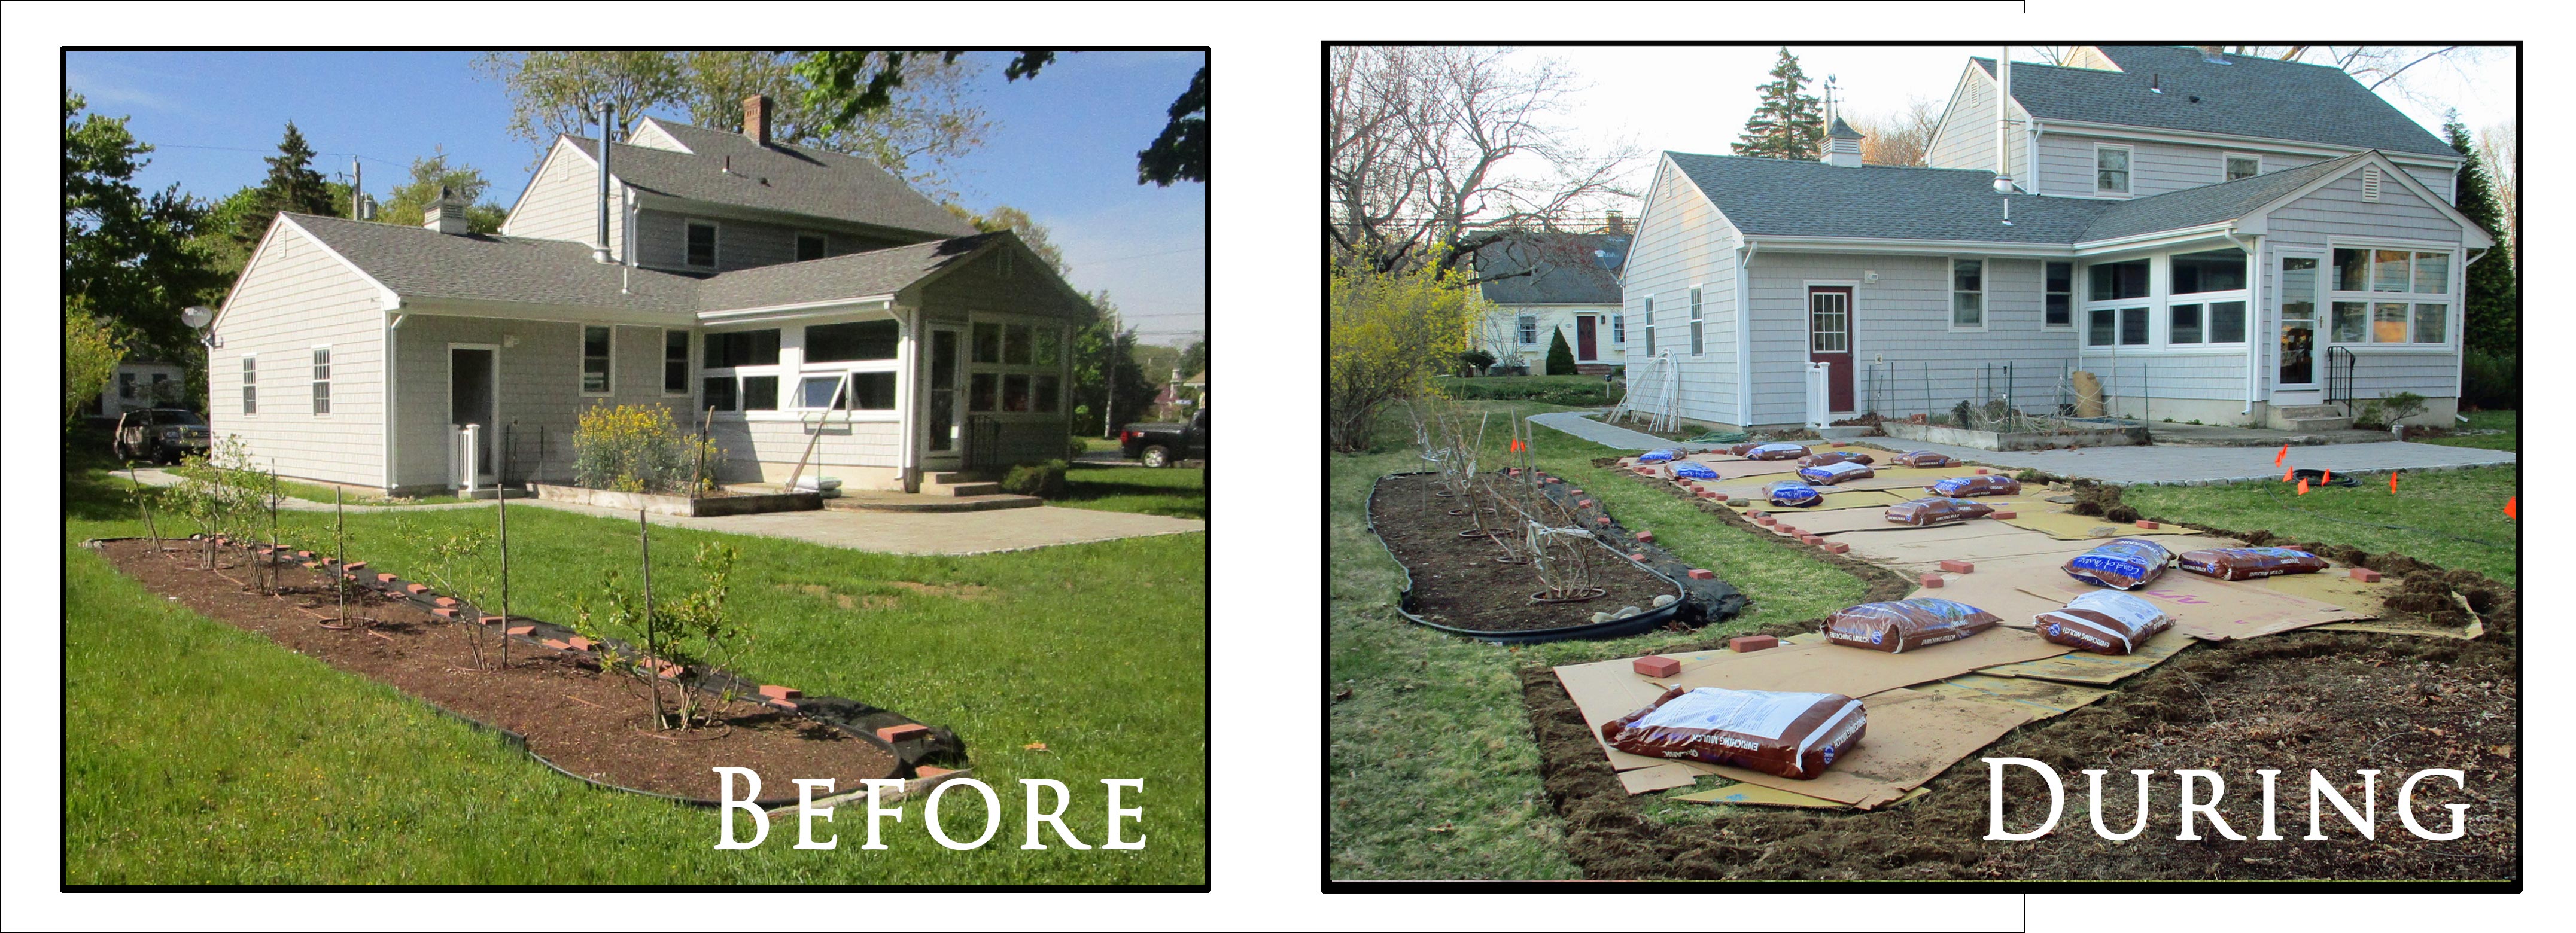
In the 2020 season we designed and installed two crescent-shaped ornamental landscape beds for MA native trees, shrubs and perennials. In the spring of 2021 we’re expanding upon last year’s work by tying in a larger portion of the back yard lawn. Because we have time on our side before the arrival of native plant meadow kits from the Native Plant Trust, we’re using the sheet composting aka lasagna method of turning lawn into garden beds.

Using flags and garden hoses, we laid out the shape of the new planting area, tweaked it, then committed to it by laying down two layers of heavy cardboard that came from local bicycle and appliance stores. The cardboard keeps sunlight from the grass to keep it from growing.

On top of the cardboard we’ll be laying down high quality drip irrigation hoses, aka pipes, that will tie into the existing lawn irrigation system. The pop-up sprinkler heads of the zone where this section of pollinator bed is going were removed and capped to preserve water, water pressure, and associated financial costs. Continue reading

Please follow and like us:

SUSTAINABLE LAWNS, HEALTHY LANDSCAPES, WETLANDS AND WATER RESOURCES

 What’s so great about a great lawn?

  • Do you want a lawn that looks like a lush golf course? It’s going to cost you…and your neighbors, your town’s water quality and other natural resources. The typical best-in-the-neighborhood MA lawns are a mix of bluegrass, rye and fescue turf grasses. These are all cool season, non-native grasses that do not naturally do well here in our summer heat and droughts; these lawns need lots of time, energy and money to look as good as they do for as long as they do.
  • The conventional practice is to follow the conventional high-input “advice” of landscape chemical companies’ and landscape vendors’ marketing efforts, including expensive fertilizer, insect and weed killers, bacteria and fungus killers, plus frequent mowing and watering.
  • Your resulting “chem” lawn may look good, but it has negative and potentially hazardous impacts on your health and that of others; your wallet and that of others; and the wetland and ecosystems that filter pollutants from your water and mitigates flood damage, pollinates your food (everything we eat was once a plant), and provides natural settings for recreation and relaxation for you and others—among many other free but essential life services.
  • Add it all up and you may realize what many others already know: that a “chem” lawn is actually more expensive and damaging than you ever thought. So ask yourself, “Is it really worth working and paying for a perfect lawn?” “Why should I care?” and, “What are healthier alternatives that save me money and time?”

What’s a sustainable lawn and why would it benefit you?

    • SOIL AND WATER: Turf grasses naturally want to send their roots down about 6-12 inches into loamy topsoil that contains about 10% organic matter, such as compost. Established lawns want to be watered deeply (one inch of water) once a week, or one inch twice during hot weather. That way, their roots never dry out for extended periods and thus they don’t go into summer brownout/dormancy. Most irrigation systems are not programmed to water lawns on this kind of schedule. Instead, most water lightly several times a week, never delivering enough water to penetrate fully to the whole root system, so the water is largely wasted. What if you don’t have appropriate soil to support a robust lawn? See three bullet points below.
    • TEST YOUR WATERING SYSTEM: You want one inch of water per week for established laws, so how do you find out how much water is actually being delivered? Before you turn on your sprinkler or your irrigation system comes on, put out a bunch of clean cat food or tuna fish cans to collect water. (Ask your friends and neighbors if you don’t have your own supply). After the system runs, use a ruler to measure how much water is in each can. If it’s not a little over an inch—the ruler will displace some water and increase the reading on the ruler—increase the run time and test again. Repeat adjustments until you get about an inch.
    • SOIL TESTING: Get your soil tested to find out what kind of soil you have, your pH, your organic matter, and what amendments you can add to make your soil more ideal for your turf grasses. The most crucial part of soil testing is getting a truly representative sample. UMass has easy to follow recommendations for soil sampling, and they test soil for a reasonable fee. Learn more at https://ag.umass.edu/services/soil-plant-nutrient-testing-laboratory
    • IF YOU DON’T HAVE IDEAL SOIL:
      1. Follow the recommendations from your soil test.
      2. Adjust your expectations and know that any lawn is a living work in progress.
      3. Good or poor soil, add ¼ to ½ inch of compost to your lawn every year late in the fall, after your last mowing. Over the winter it will improve your soil quality and improve lawn health. Do this every year, along with allowing your mowed grass clippings to fall and decompose in place, and you will not need to spend time and money fertilizing.
      4. Lime in the fall only if your soil test results call for it.
      5. If you feel you must fertilize, NEVER FERTILIZE WITHIN 100 FEET OF A WETLAND, VERNAL POOL OR POTENTIAL VERNAL POOL (or according to your local bylaw specifications). Beyond 100 feet (or according to your local bylaw specifications) of a wetland, vernal pool or potential vernal pool, apply an organic, slow release fertilizer just one time—and never just before or during a heavy rain—to your lawn between April 15th and October 15th. Limit that application to a maximum of 1 pound of nitrogen per 1000 square feet.
        Organic fertilizers have non-water soluble nitrogen that releases to the soil at a steady rate over time. They help to build a healthy soil food web, as compared with conventional chemical fertilizers which are water soluble and result in nutrients (and your money) washing away as pollution into our waterways before they’re needed by your plants. A couple of readily available organic fertilizers are Espoma Garden-tone and Espoma Plant-tone. These are typically made of ground up feathers and bones rather than conventional petrochemicals.
      6. Consider lawn alternatives
        1. Instead of turf grasses, use native, low-input sedges. Pennsylvania sedge, for instance, needs mowing only once a year and is drought tolerant after getting established.
        2. Add white clover to your lawn seed mix. Clover moves nitrogen from the soil to the ground and makes it available to green up your lawn
        3. Turn part of your lawn into an ornamental planting bed. Include native plants that are well adapted to our native soils. If well planned and designed, you’ll be saving time and money, supporting pollinators, improving water quality and the environment.
      7. SUN: Pay close attention to how many hours of mid-day sun each area of your lawn gets. Get a high quality grass seed mix to match the sun exposure. You can do many things to improve your soil—but changing the amount of sun your lawn gets is usually a bigger undertaking.
      8. MOWING: Set your mower to cut no lower than three inches. Use a mulching blade and let the clippings fall onto the lawn, where their nutrients will recycle right back into your soil, increasing your soil’s organic matter for free. Also, save time and money by not raking your leaves in the fall. Just mow them with a mulching blade and without a grass catcher, and leave them to in place to decompose. Again, free organic matter. Note: If mowing leaves a thick layer of leaves, though, spread them out with a rake so the grasses can still get some sun.
      9. WEEDS: Weeds don’t stand a chance if your turf grasses are robust, aka appropriate for where they’re growing and therefore nice and dense; grown in good deep soil with proper nutrients, organic matter, soil chemistry, water and sun.
      10. INSECTS: Most insects, approximately 99% by number of species, are native insects that play a crucial role in the food web that supports our environment, that in turn supports people. Properly identifying and learning the life cycle of pests is the most important step in managing them. Many are beneficial. If you don’t want to learn about it, get help from a natural or organic horticulturist to learn if you have a normal amount of bugs or an infestation that needs management.
      11. BACTERIAL AND FUNGAL CONDITIONS: Most bacterial and fungal conditions in lawns occur because the lawn’s cultural conditions—including soil nutrients, pH and organic matter; sun exposure and water—do not favor a robust lawn planted with non-native, cool season grass species. You can spend lots of hazardous chemical resources and still not get the results you want.
      12. AERATING YOUR LAWN: Most lawns do not need to be aerated annually. Lawn areas that have high traffic have compacted soils that make it very difficult for grasses to thrive. Most of us are familiar with the fact that plants take in carbon dioxide and release oxygen, but this is only what the plant does above ground. Plants’ roots do the opposite, taking oxygen from the tiny spaces between tiny soil particles. If the lawn soil is compacted or constantly wet, your turf grasses’ roots cannot get the oxygen they need to thrive, and the above-ground portion of the grasses will not do well. If you choose to aerate, do not use any device with a solid spike shape, as these will only compact your soil further. Instead, use a tool or machine that has cylindrical-shaped fittings that will remove plugs of soil. These greatly reduce compaction and bring oxygen into the soil for the roots.
      13. WHEN TO TOP DRESS OR INSTALL A NEW LAWN: The single best time by far is September, for a long list of reasons.


  • ADDITIONAL RESOURCES:
Please follow and like us:

GROW NATIVE MA ANNUAL PLANT SALE – JOIN ME JUNE 1st!

Help Massachusetts communities and wildlife thrive by joining me at the annual Grow Native Massachusetts Plant Sale. You’ll find over 2,000 plants covering 120 varieties, and I (and other experts) can help you make smart selections for the particular conditions of your planting area. Just look for me in a blue volunteer apron from 8-11. Shop early for best selection.

From 9-2:30 at the UMass Waltham Field Station at 240 Beaver Street, Waltham 02452, you may find:

  • Perennials sorted by sun, shade and part-shade, and all types of soil conditions
  • A large selection of evergreen and deciduous ferns
  • Grasses and sedges, both cool and warm season
  • Trees and shrubs at small sizes so you can take home in your car. Native trees and shrubs do the most to increase biodiversity and to enhance the wildlife value of your landscapes.

AND new for this year: sweet goldenrod (Solidago odora), bluestem goldenrod (Solidago caesia) and spotted beebalm (Monarda punctata)—custom grown just for this sale, as these are top native herbaceous plants for supporting the entire life cycles of our butterfly and moth pollinator friends, and a whole lot of bees’, too.

All plants are native to the eastern United States—the majority indigenous to New England

Learn more: https://www.grownativemass.org/programs/plantsale
Download a list of the species available at the 2019 Native Plant Sale


Please follow and like us:

Free Soil Testing Workshop and Brief Tick Talk May 11th

Please join me at 7 p.m. tonight at the Easton Garden Club’s monthly meeting where I’ll be leading a free soil testing workshop and also presenting a brief tick talk. The meeting is at the Covenant Congregational Church on Centre Street, in the basement gymnasium. More comprehensive testing from UMass for fertility or fertility plus organic matter is available at a small extra cost. The Club will provide bags and ship your sample to UMass.

For each garden area you want tested, bring one clean one-quart clear glass jar and lid, with 3-1/2 cups of dry soil.

THE SINGLE MOST IMPORTANT THING ABOUT SOIL TESTING is to properly sample and let your soil air dry. Info and instructions are below.

What to Bring:

1 Clean, dry one-quart clear glass jar with fairly straight sides, with a tight fitting lid for each sample you want tested. A pasta sauce or mason jar works quite well.

3-1/2 Cups of dry soil in your jar for every sample you want tested. **REMEMBER to properly sample and dry your soil before putting it in your jar.

How to Sample Your Soil:

The most critical step in soil testing is collecting the sample. It is important that you take the necessary steps to obtain a representative sample; a poor sample could result in erroneous recommendations.

The first step is to determine the area that will be represented by the sample. For instance, your veggie garden might be one sampling area, your front island bed another, and your backyard lawn still another. Soil physical appearance, texture, color, slope, drainage, past management and current intended use should be similar throughout the area. It may be helpful to draw a map of the property and identify areas where you will collect samples.

Using a clean bucket and a spade, auger, or sampling tube collect 12 or more sub-samples to a depth of six to eight inches (four to six inches for turf) from random spots within the defined area. Avoid sampling field or plot edges and other non-representative areas.

Avoid sampling when the soil is very wet or within six to eight weeks after a lime or fertilizer application. Next, break up any lumps or clods of soil, remove stones, roots, and debris, and thoroughly mix sub-samples in the bucket. Once the sample is thoroughly mixed, scoop out a little more than one cup of soil and spread it on a clean sheet of paper to air-dry. A fan set on low will help speed the drying; do not apply heat.

Please follow and like us:

TOP 5 GARDENING TIPS FOR APRIL

Do not work on your lawn or garden just after a big rain.

A note from a friendly frittilary butterfly: stepping in your garden or working on your lawn when the soil is wet damages your plants’ ability to thrive. (Image 2017 Carol Lundeen. ALL RIGHTS RESERVED)

#1. CAUTION: WET SOIL – DO NOT ENTER YOUR GARDEN – OR WORK ON YOUR LAWN!

  • Our recent rains have left our soils saturated, and if you step into your shrub and garden beds now you’ll be causing mostly invisible but meaningful damage that makes it harder for your plants to thrive.
  • Compacting your soil: plant roots depend on the spaces between soil particles to hold water and oxygen. When you step on wet soil, you compact these spaces and your plants suffer.
  • One cup of soil may hold as many bacteria as there are people on Earth, never mind the fungi, protozoa, nematodes, arthropods, and earthworms – most of which are beneficial to you most of the time. Together, these tiny beings are a living system called the Soil Food Web, and it’s best to not to step on them when the soil is wet.
  • To test if your soil is dry enough, take a handful of soil and squeeze it. If the soil crumbles easily when you open your hand, it is ready to be walked on or tilled. If it does not crumble, it is too wet. Allow the soil to dry for a few more days and test again before digging.

#2. GET YOUR SOIL TESTED – BEFORE YOU PLANT!

  • Before planting is a good time to get a Routine Soil Analysis from the UMass Soil and Plant Nutrient Testing Lab to check pH and fertility. This economical soil test will provide recommendations for liming and fertilizing as needed, as well as indicating the lead level in the soil.

#3. START YOUR COOL-SEASON VEGETABLES – ONCE THE SOIL DRAINS!

  • Now is a good time to sow seeds of cool season crops such as peas, lettuce, chard, kale, arugula, spinach, carrot, radish, beet and turnips.
  • Plant the seeds as soon as the ground can be worked. Sow your spinach, beets, radish, carrots and lettuce thickly in rows and thin later to the desired spacing (read the label) and to allow them to develop properly. Root crops such as carrots, beets, and radishes should be thinned to a 2-inch spacing to allow the roots to develop properly. They can be thinned as soon as they reach small edible size.

#4. EAGER TO JUMP START YOUR LAWN?

  • Your doctor wouldn’t give you a treatment without first making a diagnosis, right? Same goes with your lawn. Why treat your lawn for grubs or other turf insects if you don’t first discover what’s causing a problem? Grub populations are easy to evaluate, as are other sub-surface and surface insects. Once you diagnose properly, you can treat with a reasonable solution rather than automatically throwing money and chemicals at the situation.
  • Start weaning your lawn off the expensive, stepped conventional petrochemical-based fertilizers by switching to a slow release, low-nitrogen organic fertilizer like Roots Fresh Start. Apply once in early spring after the soil has begun to warm up and apply again in early fall. The water-insoluble nutrients will be recycled and released by your friendly soil microbes slowly over the entire growing season as they’re needed by your turf, rather than getting flushed (along with your money) away with rain and any irrigation.
  • Doing a lawn renovation this year? Wait until September for best results and return on your investment.

#5. MONITOR FOR WINTER MOTH CATERPILLARS

  • Winter moth caterpillars cause damage to many different deciduous plants such as oaks, maples, cherries, ash, crabapples, apples and blueberries. their eggs typically hatch early-mid April, and the young larvae quickly start feeding on flower buds, leaf buds and young developing leaves.
  • Winter moth egg hatch has not yet been observed for this growing season as of 4/5/17 in Massachusetts. Scouts are still reporting that winter moth eggs are orange in color and have not yet turned the blue color that indicates hatch is imminent. Eggs can be sprayed with dormant oil before they hatch, but the eggs can hide under pieces of bark and be hard to reach with spray.
  • Once the caterpillars hatch, they’re eager to eat their host plants. Dormant oil will no longer work, but there’s a fairly safe treatment that simply takes their appetite away. It’s a kind of bacteria called bacillus thuringiensis var. Kurstaki. In some forms it’s approved for use on organic farms. Always read and follow the label.

(BONUS #6.) CELEBRATE ARBOR DAY BY PLANTING A TREE ON APRIL 28 

  • Arbor Day is an annual observance that celebrates the role of trees in our lives and promotes tree planting and care. The best tree selection may be a native tree that is well suited to thrive in your yard with your existing soil, sun, water, and other cultural conditions. Have your soil tested before investing in your new tree or shrub.

AS ALWAYS,PLEASE FEEL FREE TO CONTACT ME IF YOU HAVE ANY QUESTIONS OR NEED A HAND! 

EMAIL CAROL  OR CALL 617-327-9254

Please follow and like us: