Tag Archives: organic

GOT SPRING FEVER? HELP POLLINATORS THIS YEAR!

Pollinate New England Program in Wellesley Shows You How to Plan and Plant a Pollinator Garden

The Wellesley Natural Resources Commission hosted a live Pollinate New England program (pre-Covid) on the importance of using native plants to support New England’s bees, insects and other pollinators. Watch this video of the program to learn the actual steps of creating a pollinator habitat garden.

Learn how to design and create a pollinator garden

You’ll learn how to attract native butterflies and moths, birds and bees to your garden and

  • put the right native plants in the right places
  • design the spacing of your plants to maximize their potential, have good looks and reduce weeds
  • get your pollinator plants established with organic gardening practices, proper watering and care
  • use ecological mulching materials and learn their benefits, such as retaining soil moisture, moderating soil temperature, and reducing weeds

The goal of Pollinate New England is to teach and encourage homeowners to plant diverse, systemic pesticide-free native plants that support a wide variety of pollinators throughout their life cycles. It’s an initiate of the Native Plant Trust (formerly New England Wild Flower Society), which received an IMLS grant to create a network of pollinator gardens, collaborating with twelve partners throughout six states, supported by a suite of in-person and distance programs and resources.

Please follow and like us:

SUSTAINABLE LAWNS, HEALTHY LANDSCAPES, WETLANDS AND WATER RESOURCES

 What’s so great about a great lawn?

  • Do you want a lawn that looks like a lush golf course? It’s going to cost you…and your neighbors, your town’s water quality and other natural resources. The typical best-in-the-neighborhood MA lawns are a mix of bluegrass, rye and fescue turf grasses. These are all cool season, non-native grasses that do not naturally do well here in our summer heat and droughts; these lawns need lots of time, energy and money to look as good as they do for as long as they do.
  • The conventional practice is to follow the conventional high-input “advice” of landscape chemical companies’ and landscape vendors’ marketing efforts, including expensive fertilizer, insect and weed killers, bacteria and fungus killers, plus frequent mowing and watering.
  • Your resulting “chem” lawn may look good, but it has negative and potentially hazardous impacts on your health and that of others; your wallet and that of others; and the wetland and ecosystems that filter pollutants from your water and mitigates flood damage, pollinates your food (everything we eat was once a plant), and provides natural settings for recreation and relaxation for you and others—among many other free but essential life services.
  • Add it all up and you may realize what many others already know: that a “chem” lawn is actually more expensive and damaging than you ever thought. So ask yourself, “Is it really worth working and paying for a perfect lawn?” “Why should I care?” and, “What are healthier alternatives that save me money and time?”

What’s a sustainable lawn and why would it benefit you?

    • SOIL AND WATER: Turf grasses naturally want to send their roots down about 6-12 inches into loamy topsoil that contains about 10% organic matter, such as compost. Established lawns want to be watered deeply (one inch of water) once a week, or one inch twice during hot weather. That way, their roots never dry out for extended periods and thus they don’t go into summer brownout/dormancy. Most irrigation systems are not programmed to water lawns on this kind of schedule. Instead, most water lightly several times a week, never delivering enough water to penetrate fully to the whole root system, so the water is largely wasted. What if you don’t have appropriate soil to support a robust lawn? See three bullet points below.
    • TEST YOUR WATERING SYSTEM: You want one inch of water per week for established laws, so how do you find out how much water is actually being delivered? Before you turn on your sprinkler or your irrigation system comes on, put out a bunch of clean cat food or tuna fish cans to collect water. (Ask your friends and neighbors if you don’t have your own supply). After the system runs, use a ruler to measure how much water is in each can. If it’s not a little over an inch—the ruler will displace some water and increase the reading on the ruler—increase the run time and test again. Repeat adjustments until you get about an inch.
    • SOIL TESTING: Get your soil tested to find out what kind of soil you have, your pH, your organic matter, and what amendments you can add to make your soil more ideal for your turf grasses. The most crucial part of soil testing is getting a truly representative sample. UMass has easy to follow recommendations for soil sampling, and they test soil for a reasonable fee. Learn more at https://ag.umass.edu/services/soil-plant-nutrient-testing-laboratory
    • IF YOU DON’T HAVE IDEAL SOIL:
      1. Follow the recommendations from your soil test.
      2. Adjust your expectations and know that any lawn is a living work in progress.
      3. Good or poor soil, add ¼ to ½ inch of compost to your lawn every year late in the fall, after your last mowing. Over the winter it will improve your soil quality and improve lawn health. Do this every year, along with allowing your mowed grass clippings to fall and decompose in place, and you will not need to spend time and money fertilizing.
      4. Lime in the fall only if your soil test results call for it.
      5. If you feel you must fertilize, NEVER FERTILIZE WITHIN 100 FEET OF A WETLAND, VERNAL POOL OR POTENTIAL VERNAL POOL (or according to your local bylaw specifications). Beyond 100 feet (or according to your local bylaw specifications) of a wetland, vernal pool or potential vernal pool, apply an organic, slow release fertilizer just one time—and never just before or during a heavy rain—to your lawn between April 15th and October 15th. Limit that application to a maximum of 1 pound of nitrogen per 1000 square feet.
        Organic fertilizers have non-water soluble nitrogen that releases to the soil at a steady rate over time. They help to build a healthy soil food web, as compared with conventional chemical fertilizers which are water soluble and result in nutrients (and your money) washing away as pollution into our waterways before they’re needed by your plants. A couple of readily available organic fertilizers are Espoma Garden-tone and Espoma Plant-tone. These are typically made of ground up feathers and bones rather than conventional petrochemicals.
      6. Consider lawn alternatives
        1. Instead of turf grasses, use native, low-input sedges. Pennsylvania sedge, for instance, needs mowing only once a year and is drought tolerant after getting established.
        2. Add white clover to your lawn seed mix. Clover moves nitrogen from the soil to the ground and makes it available to green up your lawn
        3. Turn part of your lawn into an ornamental planting bed. Include native plants that are well adapted to our native soils. If well planned and designed, you’ll be saving time and money, supporting pollinators, improving water quality and the environment.
      7. SUN: Pay close attention to how many hours of mid-day sun each area of your lawn gets. Get a high quality grass seed mix to match the sun exposure. You can do many things to improve your soil—but changing the amount of sun your lawn gets is usually a bigger undertaking.
      8. MOWING: Set your mower to cut no lower than three inches. Use a mulching blade and let the clippings fall onto the lawn, where their nutrients will recycle right back into your soil, increasing your soil’s organic matter for free. Also, save time and money by not raking your leaves in the fall. Just mow them with a mulching blade and without a grass catcher, and leave them to in place to decompose. Again, free organic matter. Note: If mowing leaves a thick layer of leaves, though, spread them out with a rake so the grasses can still get some sun.
      9. WEEDS: Weeds don’t stand a chance if your turf grasses are robust, aka appropriate for where they’re growing and therefore nice and dense; grown in good deep soil with proper nutrients, organic matter, soil chemistry, water and sun.
      10. INSECTS: Most insects, approximately 99% by number of species, are native insects that play a crucial role in the food web that supports our environment, that in turn supports people. Properly identifying and learning the life cycle of pests is the most important step in managing them. Many are beneficial. If you don’t want to learn about it, get help from a natural or organic horticulturist to learn if you have a normal amount of bugs or an infestation that needs management.
      11. BACTERIAL AND FUNGAL CONDITIONS: Most bacterial and fungal conditions in lawns occur because the lawn’s cultural conditions—including soil nutrients, pH and organic matter; sun exposure and water—do not favor a robust lawn planted with non-native, cool season grass species. You can spend lots of hazardous chemical resources and still not get the results you want.
      12. AERATING YOUR LAWN: Most lawns do not need to be aerated annually. Lawn areas that have high traffic have compacted soils that make it very difficult for grasses to thrive. Most of us are familiar with the fact that plants take in carbon dioxide and release oxygen, but this is only what the plant does above ground. Plants’ roots do the opposite, taking oxygen from the tiny spaces between tiny soil particles. If the lawn soil is compacted or constantly wet, your turf grasses’ roots cannot get the oxygen they need to thrive, and the above-ground portion of the grasses will not do well. If you choose to aerate, do not use any device with a solid spike shape, as these will only compact your soil further. Instead, use a tool or machine that has cylindrical-shaped fittings that will remove plugs of soil. These greatly reduce compaction and bring oxygen into the soil for the roots.
      13. WHEN TO TOP DRESS OR INSTALL A NEW LAWN: The single best time by far is September, for a long list of reasons.


  • ADDITIONAL RESOURCES:
Please follow and like us:

GRADUATION DAY from the NEW ENGLAND WILDFLOWER SOCIETY!

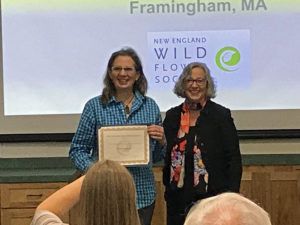
Garden-911 Boston owner Carol Lundeen graduates with Advanced Certificate in Native Plant Horticulture and Design

Carol Lundeen graduates from the New England Wildflower Society with an Advanced Certificate in Native Plant Horticulture an Design on November 3, 2018. Executive Director Debbi Edelstein presents Carol with her certificate.

One of my passions is lifelong learning, and another is to help people — and plants — who appreciate sustainable garden design and maintenance. I’m proud to have continued my studies at the New England Wildflower Society and earned an Advanced Certificate in Native Plant Horticulture an Design.

Each graduate had the opportunity to make a presentation about the required community service aspect of their certificate. I was proud to share my story of one of the two eyesore sites that I re-designed (and helped to install) at the Easton Town Offices that had been long overdue for a landscape makeover.

Easton MA Town Offices landscape makeover of traffic circle

Easton MA Town Offices traffic circle landscape makeover by the Easton Garden Club. Several civic sites in Easton had become eyesores, and the Easton Garden Club collaborated with the community to sponsor a Design Challenge to spur interest in giving the sites a landscape makeover. Blueview Nurseries of Norton donated prizes. Garden club member and Garden-911 Boston owner Carol Lundeen re-designed this site, and it was installed with the town’s robust support.

I’m excited to continue to be a valuable resource in my community. While I currently serve as Horticulture Co-Chair with both the Sharon and Easton, MA garden clubs, I look forward to future opportunities to collaborate, create and educate people about smart, sustainable landscapes.

Please follow and like us:

Why Are My Rhododendron Branches Dying?

Rhododendron, borer, Sharon, MA, insect, damage

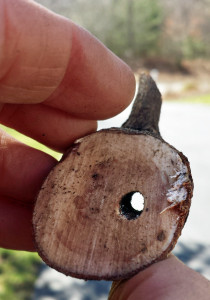
Cross-section of a rhododendron branch with a hole in it. A Rhododendron borer has tunneled all the way through this branch, and the branch is dead.

Could it be rhododendron borers? I started spring pruning for an organic gardening client in Sharon last week, on one of those yummy sunny 60 degree March days. Near her front door are broadleaf evergreen shrub beds on either side of an elegant entry path. My goals were to prune out any dead, use selective pruning to open up dense areas and stimulate new growth for a more balanced and pleasing form of individual shrubs and their big picture impact, and scout for pests.

A dead branch on a rhododendron caught my eye. I’m always very curious about why plants and their parts fail to thrive, so I investigated a bit. I cut off a portion of the dead branch and in its cross section found a dead giveaway of a clue.

It looked like an electric drill had made a 3/16 to 1/4 inch diameter hole in the interior of the stem, parallel to the length of the stem, and I knew right away it was quite likely the work of a rhododendron borer. I kept cutting the branch closer and closer to the ground, and found that the borer hole went all the way down to where the stem met the root flare at soil level. It may be that a second year borer spent some time in the roots, then bored its way toward the tip of this branch, contributing to its demise. I’ll continue to watch carefully for signs of activity and damage, and remember that borers are just one of several flavors of rhododendron pests.
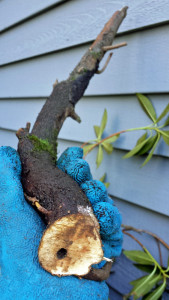
Dead branch on rhododendron, showing a borer hole in its cross-section.

This dead rhododendron branch shows a tunnel entrance created by a rhododendron borer in Sharon, MA.

How do you treat something like borers? Try the following methods, or contact me when you see damage and you need help gathering evidence and deciding how or whether to save your valued shrubs and trees.

Treatment for Rhododendron borers:

  • Look around for dead branches and cut a cross section of one. Look for other signs such as a borer’s exit hole through the branch, frass (insect poop that resembles sawdust), and the condition of the leaves and stems. Photography these signs for your records.
  • Be sure to properly identify the pest that is doing the damage. FYI there’s a separate and distinct Rhododendron stem borer
  • Cut out and destroy all affected tissue – or save a sample to send to a lab.
  • Whether there’s an effective pesticide for the two types of Rhododendron borers seems to depend on what extension service or licensed pesticide professional you ask, and in any case monitoring and prevention are the best next steps. This is an organic client who prefers organic treatments for the health of her family and the environment. An injection of nematodes into the stems may be appropriate if she has the stem borer. I’m looking into it.

Tips to help reduce borers:

  • Keep mulch at least 2-3 inches away from the base of of all plants where the stems meet the earth, including rhododendrons. Your mulch should never be more that 3 inches deep.
  • Keep shrubs well watered during dry periods. One inch of water per week is generally sufficient for established, healthy plants. More water than this is usually needed for plant establishment.
  • Avoid wounding shrubs, as wounds can make it easier for insects and pathogens to enter. If your plants have any branches that directly cross one other, they probably rub against each other when it’s windy, causing abrasion damage and creating entry points for pests and pathogens. Also, do not wound shrubs with lawn mowers and string trimmers.
  • If you don’t have an edged bed around a tree or shrub, make one large enough so that not only will your string trimmer no longer nick the trunk, but the mower won’t run over the root zone. A general guide is to edge out a bed that goes all the way to the drip line, defined as the area all the way from the trunk to the outermost circumference of the tree’s canopy . After cutting out and removing any lawn or weeds, etc. from your edged area, apply 2-3 inches of mulch to the bare soil.

Not all damage to rhododendrons is from borers. There are plenty more causes as well. So be careful, don’t jump to conclusions, get a positive ID, and get help if you’re not sure.

CONTACT ME IF YOU NEED A HAND

IF YOU’D LIKE ME TO HAVE A LOOK AT DAMAGED OR DISEASED PLANTS WITH YOU, I’LL PUT ON MY HORTICULTURIST HAT, HAVE A LOOK AND SUGGEST WHAT YOUR BEST NEXT STEPS MAY BE. CLICK HERE TO CONTACT ME

Please follow and like us: