Category Archives: Horticulture

Sharon Garden Club Flyer for September Garden Medley event

Sharon Garden Club Fall Fair – Save the Date – Sept 9

Hints of fall are in the air, and the Sharon Garden Club is celebrating on September 9th with our September Garden Medley fundraiser. Join us from 11-4 to explore the learning and fun at our two locations :

  • a horticultural guided garden tour (70 Maskwonicut Street, Sharon)
  • a Standard Flower Show (62 Bullard Street, Sharon)
  • an elegant boxed lunch in the garden (70 Maskwonicut Street, Sharon)
  • a garden shoppe (70 Maskwonicut Street, Sharon)
  • live folk music (70 Maskwonicut Street, Sharon)
  • artists at work (70 Maskwonicut Street, Sharon)
  • unique raffle items (70 Maskwonicut Street, Sharon)

TICKETS are $30 in advance, $35 the day of the event. Get tickets from me (617-327-9254 or carol@garden-911.com) or lizsiem@comcast.net.

You’ll probably find me in a stall at the barn at 70 Maskwonicut Street, the stall converted into an art exhibit for pollinator-friendly plants and a jail for nasty butterfly-killing invasive ones. WANTED: native pollinator plants, alive; WANTED: dead invasive plants.


Please follow and like us:

Hardworking Honey Bees in Porter Square

European honey bee harvests nectar from Helenium

European honey bee harvests nectar from Helenium flower in Cambridge, MA garden, while perhaps unwittingly captures pollen and moves it to other flowers for pollination. Image copyright 2017 Carol Lundeen.  All rights reserved.

What a delight to be gardening in Cambridge and have hardworking European honey bees show up in their pollinator hats. Who keeps the bees, what’s the history of the queens, and who most enjoys the honey? I want to meet these people and the hives and learn their story. Ah, I’m so lucky to have clients who appreciate these little wonders of the world.


Please follow and like us:

Free Soil Testing Workshop and Brief Tick Talk May 11th

Please join me at 7 p.m. tonight at the Easton Garden Club’s monthly meeting where I’ll be leading a free soil testing workshop and also presenting a brief tick talk. The meeting is at the Covenant Congregational Church on Centre Street, in the basement gymnasium. More comprehensive testing from UMass for fertility or fertility plus organic matter is available at a small extra cost. The Club will provide bags and ship your sample to UMass.

For each garden area you want tested, bring one clean one-quart clear glass jar and lid, with 3-1/2 cups of dry soil.

THE SINGLE MOST IMPORTANT THING ABOUT SOIL TESTING is to properly sample and let your soil air dry. Info and instructions are below.

What to Bring:

1 Clean, dry one-quart clear glass jar with fairly straight sides, with a tight fitting lid for each sample you want tested. A pasta sauce or mason jar works quite well.

3-1/2 Cups of dry soil in your jar for every sample you want tested. **REMEMBER to properly sample and dry your soil before putting it in your jar.

How to Sample Your Soil:

The most critical step in soil testing is collecting the sample. It is important that you take the necessary steps to obtain a representative sample; a poor sample could result in erroneous recommendations.

The first step is to determine the area that will be represented by the sample. For instance, your veggie garden might be one sampling area, your front island bed another, and your backyard lawn still another. Soil physical appearance, texture, color, slope, drainage, past management and current intended use should be similar throughout the area. It may be helpful to draw a map of the property and identify areas where you will collect samples.

Using a clean bucket and a spade, auger, or sampling tube collect 12 or more sub-samples to a depth of six to eight inches (four to six inches for turf) from random spots within the defined area. Avoid sampling field or plot edges and other non-representative areas.

Avoid sampling when the soil is very wet or within six to eight weeks after a lime or fertilizer application. Next, break up any lumps or clods of soil, remove stones, roots, and debris, and thoroughly mix sub-samples in the bucket. Once the sample is thoroughly mixed, scoop out a little more than one cup of soil and spread it on a clean sheet of paper to air-dry. A fan set on low will help speed the drying; do not apply heat.

Please follow and like us:

Why Are My Rhododendron Branches Dying?

Rhododendron, borer, Sharon, MA, insect, damage

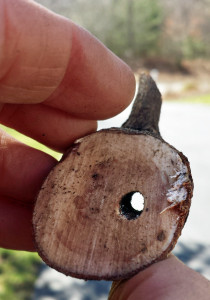
Cross-section of a rhododendron branch with a hole in it. A Rhododendron borer has tunneled all the way through this branch, and the branch is dead.

Could it be rhododendron borers? I started spring pruning for an organic gardening client in Sharon last week, on one of those yummy sunny 60 degree March days. Near her front door are broadleaf evergreen shrub beds on either side of an elegant entry path. My goals were to prune out any dead, use selective pruning to open up dense areas and stimulate new growth for a more balanced and pleasing form of individual shrubs and their big picture impact, and scout for pests.

A dead branch on a rhododendron caught my eye. I’m always very curious about why plants and their parts fail to thrive, so I investigated a bit. I cut off a portion of the dead branch and in its cross section found a dead giveaway of a clue.

It looked like an electric drill had made a 3/16 to 1/4 inch diameter hole in the interior of the stem, parallel to the length of the stem, and I knew right away it was quite likely the work of a rhododendron borer. I kept cutting the branch closer and closer to the ground, and found that the borer hole went all the way down to where the stem met the root flare at soil level. It may be that a second year borer spent some time in the roots, then bored its way toward the tip of this branch, contributing to its demise. I’ll continue to watch carefully for signs of activity and damage, and remember that borers are just one of several flavors of rhododendron pests.

Dead branch on rhododendron, showing a borer hole in its cross-section.

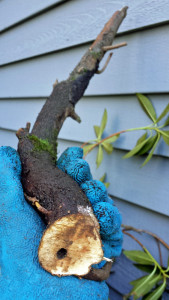
This dead rhododendron branch shows a tunnel entrance created by a rhododendron borer in Sharon, MA.

How do you treat something like borers? Try the following methods, or contact me when you see damage and you need help gathering evidence and deciding how or whether to save your valued shrubs and trees.

Treatment for Rhododendron borers:

  • Look around for dead branches and cut a cross section of one. Look for other signs such as a borer’s exit hole through the branch, frass (insect poop that resembles sawdust), and the condition of the leaves and stems. Photography these signs for your records.
  • Be sure to properly identify the pest that is doing the damage. FYI there’s a separate and distinct Rhododendron stem borer
  • Cut out and destroy all affected tissue – or save a sample to send to a lab.
  • Whether there’s an effective pesticide for the two types of Rhododendron borers seems to depend on what extension service or licensed pesticide professional you ask, and in any case monitoring and prevention are the best next steps. This is an organic client who prefers organic treatments for the health of her family and the environment. An injection of nematodes into the stems may be appropriate if she has the stem borer. I’m looking into it.

Tips to help reduce borers:

  • Keep mulch at least 2-3 inches away from the base of of all plants where the stems meet the earth, including rhododendrons. Your mulch should never be more that 3 inches deep.
  • Keep shrubs well watered during dry periods. One inch of water per week is generally sufficient for established, healthy plants. More water than this is usually needed for plant establishment.
  • Avoid wounding shrubs, as wounds can make it easier for insects and pathogens to enter. If your plants have any branches that directly cross one other, they probably rub against each other when it’s windy, causing abrasion damage and creating entry points for pests and pathogens. Also, do not wound shrubs with lawn mowers and string trimmers.
  • If you don’t have an edged bed around a tree or shrub, make one large enough so that not only will your string trimmer no longer nick the trunk, but the mower won’t run over the root zone. A general guide is to edge out a bed that goes all the way to the drip line, defined as the area all the way from the trunk to the outermost circumference of the tree’s canopy . After cutting out and removing any lawn or weeds, etc. from your edged area, apply 2-3 inches of mulch to the bare soil.

Not all damage to rhododendrons is from borers. There are plenty more causes as well. So be careful, don’t jump to conclusions, get a positive ID, and get help if you’re not sure.

CONTACT ME IF YOU NEED A HAND

IF YOU’D LIKE ME TO HAVE A LOOK AT DAMAGED OR DISEASED PLANTS WITH YOU, I’LL PUT ON MY HORTICULTURIST HAT, HAVE A LOOK AND SUGGEST WHAT YOUR BEST NEXT STEPS MAY BE. CLICK HERE TO CONTACT ME

Please follow and like us:

Miss Twiggy Aces RI Certified Horticulturist Exam

Rhus typhina winter twig with bud in leaf scar

Winter bud inset in a leaf scar of Rhus typhina, staghorn sumac in Sharon, MA. It looks like the face of a lion, which is how I remembered it for my RI Certified Horticulturist exam. [Photo Copyright 2017 Carol Lundeen].

Miss Twiggy.  That’s what my wife has been calling me  lately.  Our dining room table has practically been crawling with the winter twigs of trees, shrubs, and vines: messy, shedding, needle-dropping deciduous and evergreen winter twigs.  I’ve been studying them for six weeks for my RI Certified Horticulturist exam.  Why?  I’m a nature girl, and I love looking at things up close.

Did you have any idea that a winter twig could be so adorable as the one shown above?  Me neither.  Until Dr. Susan Gordon taught me how to notice and appreciate the diversity of these things.  I want to get so I can tell the winter twig of a glossy false buckthorn from a black cherry as easily as a dalmation from a beagle.  I aced both the written and ID portions of my exam Monday night.  I’m certifiably certified, so happy there’s so much more to learn, so thankful to everyone who’s helped me, and I can’t wait for the new gardening season!

Please follow and like us: